Let’s Create a Secure HD Bitcoin Wallet in Electron + React.js
(Full Code hosted on GitHub)

As the planet is bracing for an exciting future in crypto, so do we, developers keep up to date with the technology. As there are still few posts written about programming the blockchain, I decided to write a fully-fledged HD bitcoin wallet as an Electron desktop app to teach myself and others in the process.
Also Read: Best Bitcoin Hardware Wallets
The goal of this article is not to deepen our knowledge on Electron, React or AntD but to explore Bitcoin. For this reason, any UI or interactivity code was omitted and should be viewed directly from the source code on GitHub. Please download the repo now and keep it open as a companion to this article as I am going to be referring to the code rather than pasting it here.
Creating our First Wallet
Download and run the example app.

The first Tab of the example app contains all the functionality we need to create an addresses, receive bitcoins and send them to another address. The other two are mostly fluff as I just felt the need to create something more complete for the heck of it.
The first step in creating a wallet is creating a key pair. Pressing “create” will bring up a modal panel containing a form with the necessary fields. Now, in some examples you might have seen something like this:
const bitcoin = require('bitcoinjs-lib');
const keyPair = bitcoin.ECPair.makeRandom();
const address = keyPair.getAddress();
This is indeed the simplest way to create a key pair and an address but it is not really complete. Modern implementations use a method by which the initial randomness (entropy) used in creating a key is serialised into a mnemonic phrase and saved so that it can later be used to re-create the key. This is extremely useful in the case of importing keys from one wallet to another and restoring lost ones.
/* file: wallet.class.js
 * methods: generate, create */const mnemonic = bip39.generateMnemonic();

const seed = bip39.mnemonicToSeed(mnemonic);
const master = bitcoin.HDNode.fromSeedBuffer(seed);

const derived = master.derivePath("m/44'/0'/0'/0/0");
const address = derived.getAddress();
const privateKey = derived.keyPair.toWIF();
Now, there is a lot going on. A mnemonic is just a random number rendered as an array of words (strings) taken from a pre-set list defined in bip39. The original seed number is split into 5-bit parts where each is used as an offset to the table to retrieve a word. We will not store these words but simply display them, delegating some of the responsibility to the user who could literally store them in her memory as the word “mnemonic” implies.

If the user wishes to discard them, it is up to them. The wallet will be just as functional, apart form the ability to restore the wallet in another system.
Using the seed number (or word list), a master key is created. From that we can derive an infinite number of child keys, each able to derive child keys of its own. Here is how it’s done...
Understanding Key Derivation
HD stands for Hierarchical Deterministic. Imagine the master key being the root node of a tree structure. Each child node is another key that is derived deterministically (i.e. it will be the same every time we derive it) from the master. Each of the children nodes can derive their own keys and so forth.
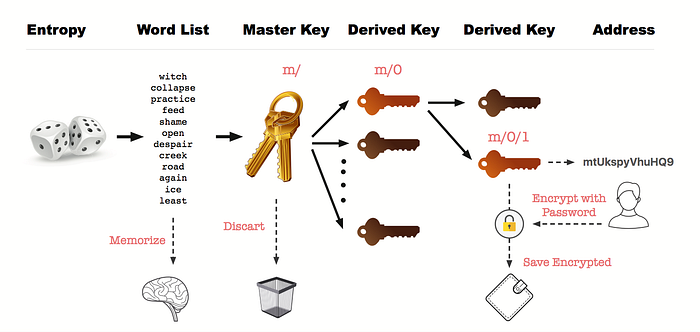
A derivation path m/0/1 means that starting from the master (m), we take the 1rst (0-indexed) child and from that the 2nd as seen above (some paths are marked asm/0'/0' using a single quote after the index number, meaning hardened).
Now, we can throw away the master key and let the user decide how and where to store the mnemonic. This means that the address we end up with is a derivation of a master key that no longer exists anywhere. All that exists is the potential to re-create it through the mnemonic sequence.
Storing Keys Securely
I did not put “secure” on my title as clickbait! As you might have seen from creating a key is that apart from a name you will be asked to provide for a password. This password will encrypt the private part of the key and store it in the database. For this job, I have chosen a pure Javascript flat-file DB called NeDB. It is not designed to store millions of records or to retrieve complex data in milliseconds but it will do for the job.
When saving passwords of any kind on a database we never use the cleartext but only a hashed derivative. In this way, even if the database is compromised, the hacker will not be able to retrieve the original password and use it on our system (or even worst, and since many users use one password for everything… everywhere!). I used the crypto module of Node to hash the password.
import Datastore from 'nedb';// pwd is the password we retrieved from the form
const hash = crypto.pbkdf2Sync(pwd, 'salt', 2048, 48, 'sha512');
const cipher = crypto.createCipher('aes-256-cbc', hash);
let encrypted = '';
encrypted += cipher.update(privateKey, 'utf8', 'hex');
encrypted += cipher.final('hex');const wallet = { name: name, address: address,  // metadata
                 enckey: encrypted, pass: hash, // security
                 coins: 0, utxos: [] };         // coinsconst options = { filename:'./db/wallets.db', autoload:true };
this.db = new Datastore(options);
this.db.insert(wallet, cb); // in cb, notify the user through the UI
(Note: In my code I used the async version of the pbkdf2 function because these types of algorithms are designed to be intentionally slow so as to avoid a dictionary style attack.)
To decode, ask the user for a password, rehash it and decrypt the key:
const hash = crypto.pbkdf2Sync(pwd, 'salt', 2048, 48, 'sha512');
const cipher = crypto.createDecipher('aes-256-cbc', hash);
let decrypted = '';
decrypted += cipher.update(encryptedData, 'hex', 'utf8');
decrypted += cipher.final('utf8');
Understanding Transactions
Imagine if you will an economy where instead of cash or credit, goods can be purchased through exchanging receipts from previous purchases. If I owned a store in this strange economy, for instance, I could take a receipt from my cashier’s desk and go to a store next to mine and use it as money. I would tell the owner something like this: “Look, someone bought goods from my store for a total amount of 20 klübecks, and I have a receipt with his signature to prove it. I want to buy this item over there. There is a place in our public square with a “spike holder” like those we see in restaurants for piling receipts. I will post my receipt on this “public ledger” and sign it over to you. You can now issue a new receipt for the item that I want to buy, and I will sign it too. From then on, you will be able to use this new receipt to make purchases for yourself just like I did, and if anyone claims that I never had the money to begin with, he could look at the original receipt on the public ledger, which has the signature of my own customer, and which proves that I was given the amount. If anyone doubts that my own customer had the money, they can look into this public ledger, and dug somewhere inside, they will find that he was also given a receipt at some point in the past. They can go on repeating the process until they are convinced the money existed.”

Now you might ask, how on earth did the first receipt came to be, so as to kick-start the whole system? Well, the people who designed the system kind of cut receipts to themselves… which is called mining in bitcoin speak. I know, it sounds a little simplistic, but I assure you that it’s not far from reality. See, a bitcoin wallet does not store bitcoins, in any form, period! All that exists is the Blockchain: a linked list of transactions from the beginning of time, with each transaction referencing a previous one. There, a transaction (formatted in JSON) looks something like this:
{
   "lock_time":0,
   "size":191,
   "inputs":[
      {
         "prev_out":{ // 1. (see below)
            "index":0,
            "hash":"7e3ab0ea65b60f7d1ff4b231016fc958bc0766a4677"
         },
         "script":"47304402201c3be71e1794621cbe3a7adec1af25f818..."
      }
   ],
   "version":1,
   "vin_sz":1,
   "hash":"5d42b45d5a3ddcf2...",
   "vout_sz":1,
   "out":[ // 2.
      {
         "script_string":"OP_DUP OP_HASH160 e81d74...", // 3.
         "address":"1NAK3za9MkbAkkSBMLcvmhTD6etgB4Vhpr",
         "value":20000,
         "script":"76a914e81d742e2c3..."
      }
   ]
}
Each transaction has an identifier in the form of a hash, in the case above it is 5d42b45d5a3dd[…]. It also contains inputs and outputs which indicate where the money came from (previous transactions) and where it is going (valid addresses).
If the transaction above was sent to an address that I own, it would say something like this:
- Someone has sent me Bitcoins through a previous transaction with hash 7e3ab0ea65b60[…]. As a proof of this, I provide the
"script":"473044022…"in my input which can unlock the equivalent script from the previous transactions’s 1rst (0-indexed)"out". (Note that the amount that was sent together with my address is not presented above. This means that to verify what I am saying one should query the blockchain with the hash provided here and retrieve the transaction it is referring to) - Using the Bitcoins contained in that previous transaction, I will send 20000 Satoshis (0.00000001 BTC) to the address 1NAK3za9MkbAkk[…]. I record this in the out section above.
- I lock the 20000 Satoshis with
"script":"76a914e8…". For the receiving address to claim them (ex. send them to another address), it needs to create a transaction where the"inputs":[{"prev_out":{"hash":…will be the hash of this transaction, the"inputs":[{"prev_out":{"index":…will be 0 referring to it’s first (and only) output, while finally the"inputs":[{"script":…will match the"out":[{"script":…on this transaction.
For the moment let’s not concern ourselves with how the scripts match. The point is that transactions work in pairs. Each transaction refers to a previous one which in turn refers to one before, thus forming a long chain which spans from the start of the Bitcoin network continuing to infinity.
Another way of saying it, is that owning Bitcoin is nothing more that owning the cryptographic keys needed to unlock an output script from a previous transaction stored on the Bitcoin Network.
Here are two transactions that illustrate the above:
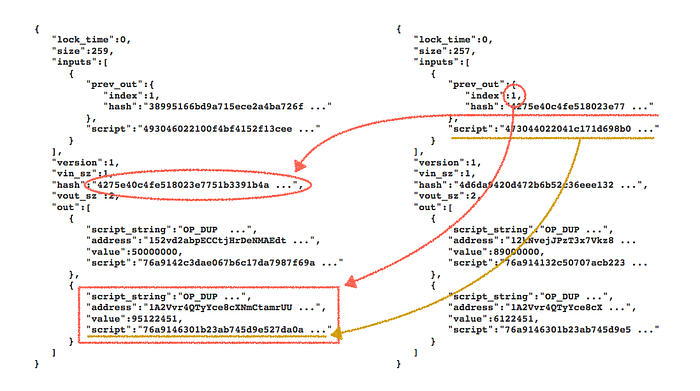
If we only have the second (right side) transaction in our hands, we need to use the hash and index from prev_out to get the transaction it is referencing and it’s output . There we will find the address and the amount the transaction at hand was using.
Let’s Send Some Money to our Wallet
With the current value of Bitcoin you might think we are crazy. What if something goes wrong? Here however we are not using the real Bitcoin network and it’s Blockchain but another, maintained specifically for the occasion of developing applications called testnet. Let’s visit a faucet and put our new address on the field. We should now have coins! Remember that these coins are not stored anywhere but are registered as UTXOs (Unspend Transaction Outputs) on the global network. Various serives can be used to query that network. Here I have used the official client designed to query blockchain.info so let’s install it with npm.
import { blockexplorer } from 'blockchain.info';
let testexplorer = blockexplorer.usingNetwork(3); // use testnet// given a simple wallet object
const resolve = (obj) => {
    const utxos = obj.unspent_outputs;
    wallet.utxos = utxos;
    let satoshis = utxos.reduce((s,c) => s + curr.value, 0);
    wallet.coins = satoshis / 100000000;
};
testexplorer.getUnspentOutputs(wallet.address).then(resolve);
Note that the code in the actual app is a little different (to account for multiple wallets) but the essense is that we make a request using the address we had sent the coins to through the faucet and summing all the unspent outputs to get the total value.
The coins accessible to a wallet are the sum total of all the unspent outputs present on the global network that have it’s address.
Now that we summed all outputs to get the coins for each wallet we could sum up all wallets to get a grand total of the Bitcoins we own (on testnet). We could, for the sake of our example, use the real price of Bitcoin to get a sense of what we did. We will use the same client again:
import { exchange } from 'blockchain.info';const resolve = (price) => {
    let total = this.wallets
                    .map(w => w.price * price)
                    .reduce((s,c) => s + c, 0);
    this.setState({ total: total }); // React's state
};
exchange.getTicker({ currency: 'USD' }).then(resolve);
Making a Transaction
Now for the last stage. Sending money to a receiver. Remember from above that what a wallet has is not Bitcoins but the ability to unlock the script of an output found on a previous transaction. We have just transfered coins from a faucet and can see it when we make a query through blockchain.info.
Let’s create a second address and transfer some money there. Although both will be residing in the same wallet, the payment still needs to go through the network.
First we have to retrieve the private part of our key as we had encrypted it.
// get the encrypted key from the database
const cipher = crypto.createDecipher('aes-256-cbc', password);
let decrypted = cipher.update(wallet.wif_enc, 'hex', 'utf8')
decrypted += cipher.final('utf8');
const key = bitcoin.ECPair.fromWIF(decrypted, net);
Remember how we queried the blockchain and got all the UTXOs for each of our addresses:
import { blockexplorer } from 'blockchain.info';const testexplorer = blockexplorer.usingNetwork(3); // for testnet
testexplorer.getUnspentOutputs(wallet.address).then(result => {
    wallet.utxos = result.unspent_outputs;
});
With this in our hands we can try to sum up enough satoshis to satisfy our send request.
const sending = 200000; // the amount we wish to sendconst net = bitcoin.networks.testnet;
const txb = new bitcoin.TransactionBuilder(net);// loop through the available outputs until the amount is reached
let input = 0;
for (let utx of wallet.utxos) {
    txb.addInput(utx.tx_hash_big_endian, utx.tx_output_n);
    input += utx.value;
    if (input >= sending) break;
}const change = total - sending;txb.addOutput(values.address, sending);// return the rest to the wallet's address
if (change) txb.addOutput(wallet.address, change);txb.sign(0, key);const raw = txb.build().toHex();
console.log(raw);
The bytes outputted can be verified with any service.
Lastly, we need to broadcast our transaction to the network. We will do this with our chosen interface from blockchain.info.
import { pushtx } from 'blockchain.info';
const promise = pushtx.usingNetwork(3).pushtx(raw);
const message = 'Transaction Submitted';
promise.then(result => {
    if (result === message) { /* handle success */ }
    else { /* handle failure */ }
});
If we go about doing that, we will not get through and instead receive a warning saying “min relay fee not met.” For a transaction to be picked up from the network it needs to provide a fee by changing a few lines of code. Note that the fee is not an additional output but an implied amount, deducted by the difference between [input used - (amount send + change)].
const change = input - (sending + fee);
txb.addOutput(values.address, sending);
if (change) txb.addOutput(sw.address, change);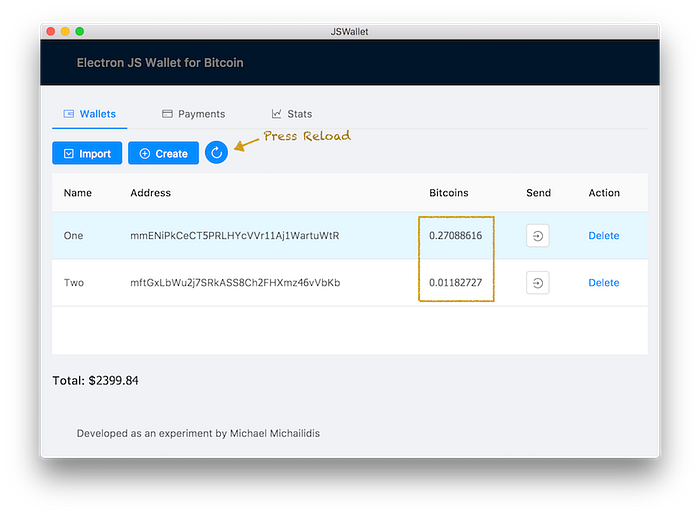
Note: It is not easy to calculate the fee as it is the result of everyone betting for what they think is fair, and the value is relative to that. In this code I have used an API that provides a decent estimate.
Conclusion
I hope that I described a practice that is a little more advanced than the rest of the tutorials found on this site (and the web in general) and it comes from actual experience with Bitcoin applications.
Join Coinmonks Telegram Channel and Youtube Channel get daily Crypto News
Also, Read
- Copy Trading | Crypto Tax Software
- Grid Trading | Crypto Hardware Wallet
- Crypto Telegram Signals | Crypto Trading Bot
- Best Crypto Exchange | Best Crypto Exchange in India
- Best Crypto APIs for Developers
- How to Swap Crypto on Uniswap? | A-Ads Review
- WazirX vs CoinDCX vs Bitbns | BlockFi vs CoinLoan vs Nexo
- LocalBitcoins Review | Cryptocurrency Savings Accounts
- What is Margin Trading | Dollar-Cost Averaging
- Uphold Card Review | Trust Wallet vs MetaMask
- Best Crypto Lending Platform
- Free Crypto Signals | Crypto Trading Bots
- An ultimate guide to Leveraged Token

